如何在WordPress的主题首页添加一个最新文章列表的功能呢?
许多主题都无法直接显示最新文章,特别是cms的主题,在首页最开始往往都会显示各种模块。
那么自己添加一个最新文章列表就更加方便老用户观看了,这里分享的方法同样适用于dux主题。
首页添加最新文章列表
首先然我们开看看添加之后的效果图吧:
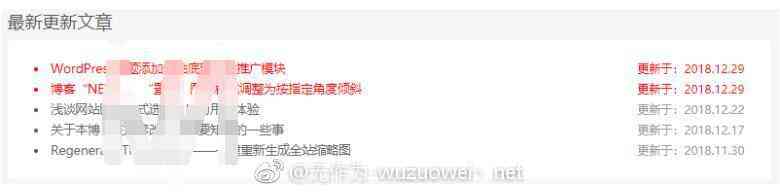
这个列表显示的地方大家可以自定义选择。
教程开始
这里以dux主题为例,其他的主题一样操作即可:
新建 module_recently_updated_posts.php 文件
新建一个名为 module_recently_updated_posts.php 的文件,然后复制以下代码至文件中即可,注意选择 UTF-8 编码格式。
将保存后的文件丢到主题文件夹下,DUX 主题丢到 modules 文件夹下即可。
<?php
/**
* 无作为分享:www.wuzuowei.net
*/

$num = QGG_Options('recently_updated_posts_num');
$days = QGG_Options('recently_updated_posts_days');
function recently_updated_posts($num = 5,$days = 7) {
if( !$recently_updated_posts = get_option('recently_updated_posts') ) {
$i=0;
$args = array(
'post__not_in' =>get_option('sticky_posts'),
'post_status' => 'publish',
'posts_per_page' => -1,
'orderby'=> 'modified',
);
query_posts($args);
while ( have_posts() && $i < $num ) : the_post();
if (current_time('timestamp') - get_the_time('U') > 60*60*24*$days) {
$i++;

$t1=get_the_modified_date("Y-m-d H:i:s");
$t2=date("Y-m-d H:i:s");
$diff=(strtotime($t2)-strtotime($t1))/86400;
if( $diff < 1){
$color = red;
} else {
$color = "";
}

$the_title_value = get_the_title();
$recently_updated_posts.= '<li style="color:'.$color.';"><a style="color:'.$color.';" href="'.get_permalink().'" title="'.$the_title_value.'">'.$the_title_value.'</a><span style="color:'.$color.';"> 更新于:'.get_the_modified_time('Y.m.d').'</span></li>';
}
endwhile;
wp_reset_query();
if ( !empty($recently_updated_posts) ) update_option('recently_updated_posts', $recently_updated_posts);
}
$recently_updated_posts = ($recently_updated_posts == '') ? '<li>暂无最新更新文章</li>' : $recently_updated_posts;
echo '<div class="posts_list_block">
<div class="title"><h3>'.QGG_Options('recently_updated_posts_title').'</h3></div>
<div class="posts_list_block_bg"><ul>'.$recently_updated_posts.'</ul></div>
</div>';
}
recently_updated_posts($num,$days);

?>
代码主要用于生成最近更新的文章列表,然后将其保存在名为 recently_updated_posts 的数据库字段里,你可以在 wp_options 数据表里找到它。主要是为了减少数据库查询量而设置的。
functions.php 文件修改
由于上面生成的文章列表以静态的形式保存在了 wp_options 数据表里,为了我们每次发布/更新文章后都能生成新的最新更新文章列表,需要清空原有 recently_updated_posts 字段信息并生成新的信息,所以需要将以下代码丢到主题的 functions.php 文件中,以确保每次发布/更新文章时都能清空 recently_updated_posts 的字段信息。
//新发表文章/修改文章时清空 recently_updated_posts 选项
function clear_rup_cache() {
    update_option('recently_updated_posts', '');
}
add_action('save_post', 'clear_rup_cache');
options.php 文件修改
由于博客目前使用的主题采用的 然后我们修改下主题下的 Options Framework 做的后台控制选项,所以我也基于此设置了对应的后台选项。当然其他主题直接修改 module_recently_updated_posts.php 文件中的代码以符合自己网站也是可以的。
// 首页最新更新文章列表
$options[] = array(
'name' => __('最新更新文章', 'QGG'),
'desc' => __('开启', 'QGG'),
'id' => 'recently_updated_open',
'std' => true,
'type' => 'checkbox');

$options[] = array(
'name' => __('最新更新文章-标题文字', 'QGG'),
'desc' => __('显示在最新更新文章列表左上角的标题文字', 'QGG'),
'id' => 'recently_updated_posts_title',
'std' => __('最新更新文章', 'QGG'),
'type' => 'text');

$options[] = array(
'name' => __('最新更新文章-显示文章数', 'QGG'),
'desc' => __('纯数字,最多允许多少篇最新文章显示', 'QGG'),
'id' => 'recently_updated_posts_num',
'std' => 5,
'class' => 'mini',
'type' => 'text');

$options[] = array(
'name' => __('最新更新文章-多少天外', 'QGG'),
'desc' => __('纯数字,多少天以外的文章更新后才显示。不明白?<a rel="nofollow" href="https://www.wuzuowei.net/link?url=aHR0cHM6Ly9ibG9nLnF1aWV0Z3VvZ3VvLmNvbQ==">点击这里</a> 进行留言。', 'QGG'),
'id' => 'recently_updated_posts_days',
'std' => 7,
'class' => 'mini',
'type' => 'text');
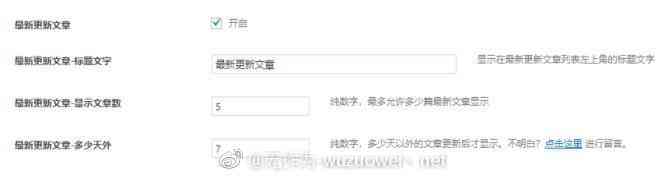
将以上代码丢到 options.php 文件中去即可,修改完成后应该会在主题后台看到如下选项:
控制前端显示代码
在主题的 index.php 文件中合适的位置插入如下代码,注意代码中的路径改成第一步中 module_recently_updated_posts.php 文件的实际路径。
<?php
if( QGG_options('recently_updated_open') ){
include get_stylesheet_directory() . '/modules/module_recently_updated_posts.php';
}
?>
保存后台配置选项,刷新首页应该就能看到前端显示的内容了。
CSS 样式美化
默认的样式不太好看,这里简单美化一下,CSS 不合适的大家自行调整下即可。
/* 最新更新文章列表 */
.posts_list_block{
margin: 5px 0px;
}
.posts_list_block_bg {
background:#FFF;
padding:1px 20px;
margin:10px 0px;
border-radius:4px;
}
.posts_list_block_bg ul{
padding: 20px 10px;
list-style-position: inside !important;
list-style: disc;
overflow: hidden;
}
.posts_list_block_bg li{
line-height: 24px;
white-space: nowrap;
overflow: hidden;
clear: both;
text-overflow: ellipsis;
}
.posts_list_block_bg ul>li>span{
color: #999;
font-size: 12px;
line-height: 24px;
float: right;
}
最后,为了避免复制代码导致的错误,上面所有用到的代码文后会提供下载。